Forms are, without doubt, one of the internet’s most powerful and versatile tools. Whether you’re looking to create a checkout page for your e-commerce site or are thinking of setting up a survey of sorts, a form will help you collect that information efficiently and consistently.
And although the WordPress Plugin Directory is chock full of plugins that’ll help you create all kinds of forms, we recommend giving Google Forms a shot first. Google Forms allows you to share your form with viewers through your WordPress website, email, social media, or Google Drive.
With this in mind, in this post, we’ll show you how you can create a Google Form and add it to your WordPress website – in two different ways! But before we begin, let’s take a quick look at what Google Forms are and what features they offer.
What Are Google Forms?
Google Forms is a feature-packed forms tool that comes with Google’s online app suite. It makes it incredibly easy for users to collect their customers’ information quickly and without any hassle. Google Forms was launched as a standalone app in 2016 before which it was simply a feature that came with Google Sheets.
Here are a few reasons why you might want to consider using Google Forms to create your forms:
- Real-time responses. You’re able to view customer responses in real-time. In addition to this, you can see how individual respondents answered specific questions.
- Media items. It allows you to insert images and YouTube videos directly into the form’s questions to make them easier to understand or offer further information.
- Powerful features. Features like pre-filled responses, required fields, file uploads, and multiple choice grids make it easier for you to gather the data you need.
- Tons of add-ons. You get access to a wide-range of add-ons to make your form even more functional.
Now that you have a better understanding of what Google Forms are, let’s start off by making a quick user submission form and then add it to our WordPress website.
How to Create Your First Google Form
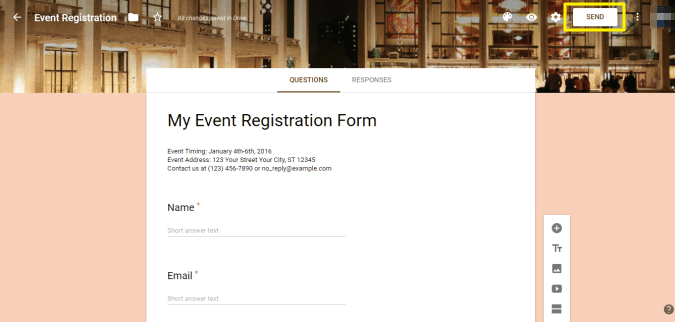
For the purpose of this tutorial, we’ll show you how to create a simple event registration form and then publish it through your WordPress website. To get started, log in to your Google account and head over to Google Forms.

Next, select a template from the Template Gallery or start a new form from scratch. We’re going with the Event Registration template.

You can use the floating menu to add more questions, enter title/description, insert media items, and create more sections.

If you’re using a template then modifying the existing design is pretty straightforward. All you have to do is click on the section you’d like to customize and you can change the question, response options, and answers.
Now that your form is complete, hit the eye icon to preview it. If you’re happy with how it looks then it’s time to make the form available to your site’s audience.
How to Add Google Forms to Your WordPress Website
Once your form is complete and ready to go you can publish it and start getting responses to it. In this section, we’ll show you how to add Google Forms to your WordPress website by embedding the iframe code directly onto your site and by using a plugin. Let’s step through both options one at a time.
Method 1: Embedding the iframe Code
The easiest way to add Google Forms to WordPress is by embedding their iframe codes directly into your website.
To get started, click on the Send button in the top-right corner of the screen.

You’ll see a Send form pop-up appear on the screen prompting you to select how you’d like to send the Google Form.

Switch over to the Embed HTML option by clicking on the angle bracket icon and copy the iframe code to your clipboard.

Next, log in to your WordPress website and navigate to the page (or post) where you’d like to add the Google Form. Open up the HTML text editor and paste the iframe code into it.

Once that’s done, hit the Save Draft button and Preview the page on your site’s front-end. Here’s how our Google Form looks on WordPress:

Method 2: Using the Google Forms Plugin
If you’d like more control over how the Google Form appears on your website, you can use the Google Forms plugin instead. The standout feature on offer with this plugin is that it removes the Google wrapper HTML and embeds the form directly into your website’s pages or posts.

Log in to your WordPress website and head over to Plugins > Add New. Next, search for the Google Forms plugin and install and activate it once you find it.

Now, navigate to Google Forms > Add New Google Form from the sidebar menu. You’ll be prompted to enter your Google Form Details. In order to fill this out, first head back to your Google Form and get its URL from the Send form pop-up.

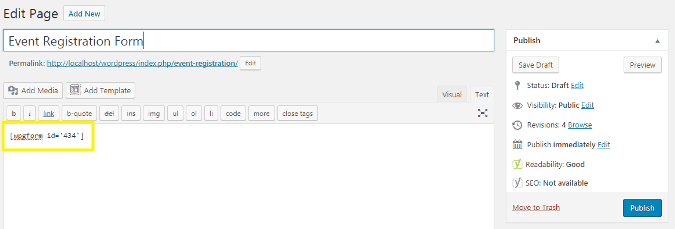
Next, enter your form’s link into the Form URL box and fill out the remaining configuration options as you see fit. Once you’re done with that, publish the Google Form and copy its corresponding shortcode value.

Finally, open up the page (or post) where you’d like to add the Google Form and paste the shortcode in its HTML text editor.

That’s it! The Google Form should be added to your WordPress website and you can preview it on the front-end. It’s important to note that your form’s appearance will now depend on your active theme. You can, of course, add custom CSS to your form using the Google Forms plugin’s configuration options.
Conclusion
Google Forms is a powerful tool that allows you to create all kinds of forms from simple checkout pages to dynamic surveys that display different questions for different response types. In addition to this, it’s incredibly easy to use Google Forms with your WordPress website.
Let’s quickly recap the different ways you can integrate Google Forms with WordPress:
- Embed the iframe code directly into the page (or post) where you’d like to add the Google Form.
- Use the Google Forms plugin to add the form to your site using shortcodes.
Hopefully, you’re in a good position now to take the next steps. We encourage you to try out both options and see which one works best for you.
Do you have any questions about how to use Google Forms with WordPress? Let us know in the comments section below!


5 thoughts on “Using Google Forms With WordPress”
Great Article!!
Just in time to help me
Thanks for this informative article I just want to know using google form can hurt website speed?
Hi Amna, I have not tested this but I doubt that Google Forms would be an issue for page speed. Google themselves are very vocal about the importance of page speed so I feel certain they will make sure their own products load very quickly. Also, it’s Google! I think we can safely assume they have the most robust server infrastructure in the world, certainly capable of handling more traffic than the hosting we’re all using 🙂
Thank you for this article. Just in time to help me! 🙂
Great Article Charles!!
This step by step guide will be very helpful to the beginners. I admire your work.